Category: Radiology

Hepple MRI staging classification for osteochondral lesions of the talus

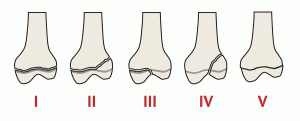
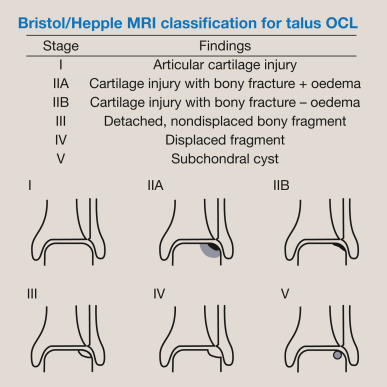
The Hepple MRI Staging Classification is a significant framework used to categorize osteochondral lesions of the talus. These lesions involve damage to the cartilage and underlying bone of the ankle joint, often caused by trauma or repetitive stress. The Hepple classification assists in evaluating the severity of such lesions based on MRI findings, aiding in treatment planning and patient management.

The Hepple MRI Staging Classification is divided into four distinct stages:

Stage I: This initial stage is characterized by a subchondral fracture, which appears as a signal change on MRI. The overlying cartilage may remain intact, and there might not be any noticeable separation between the cartilage and the bone. This stage indicates early damage, highlighting the importance of prompt diagnosis and intervention.

Stage II: In Stage II, there is evidence of cartilage separation from the underlying bone, often referred to as a “flap lesion.” This separation can be observed on MRI, and it indicates more significant damage to the osteochondral unit. Timely intervention at this stage can potentially prevent further deterioration.

Stage III: Continuing the progression, Stage III involves a partially detached cartilage fragment within the joint. This fragment is visible on MRI and is indicative of more advanced osteochondral damage. Treatment strategies at this stage may involve addressing the detached fragment to alleviate symptoms and prevent further complications.

Stage IV: The final stage of the Hepple classification represents complete detachment of the cartilage fragment within the joint. The detached fragment can be visualized on MRI and may even displace into the joint space. This stage underscores the urgency of appropriate management, which might include surgical options to restore joint function and prevent long-term consequences.

Scintigraphy (bone scan) for feet

Scintigraphy, also known as a bone scan, is a medical imaging technique that uses a small amount of radioactive material to produce images of bones in the body. It is often used to evaluate the bones of the feet and to diagnose and monitor conditions such as fractures, infections, arthritis, and tumors.

During a scintigraphy procedure, a small amount of a radioactive tracer material is injected into a vein in the patient’s arm. The tracer material then travels through the bloodstream and accumulates in areas of bone that are undergoing active changes or have an increased blood supply. A special camera then captures images of the foot, showing areas of the bone that have taken up the tracer.

Scintigraphy is a safe and non-invasive procedure that typically takes between 1-3 hours to complete. Patients may be asked to lie still on a table during the procedure. The amount of radiation exposure from a bone scan is generally considered to be very low and poses little risk to the patient.

Scintigraphy for the feet can help identify bone abnormalities that may not be visible on X-rays or other imaging tests. It can also provide valuable information about the extent and severity of conditions affecting the bones of the feet, which can help guide treatment decisions.

Your doctor may recommend scintigraphy for the feet if you have symptoms such as foot pain, swelling, or limited mobility, or if they suspect a bone abnormality that cannot be identified through other imaging techniques.

SPECT-CT for feet

SPECT-CT (Single Photon Emission Computed Tomography-Computed Tomography) is a medical imaging technique that combines two imaging modalities, SPECT and CT, to create a three-dimensional image of the body. It is often used to diagnose and evaluate conditions in the feet, such as fractures, infections, and tumors.

SPECT uses a small amount of a radioactive substance called a tracer, which is injected into the patient’s bloodstream. The tracer emits gamma rays, which are detected by a specialized camera to create images of the foot’s internal structures. CT uses X-rays to create detailed images of the bones and soft tissues in the foot. Combining the two modalities allows for more accurate and detailed images than either technique alone.

SPECT-CT for the feet is a non-invasive procedure that typically takes between 30-60 minutes to complete. Patients are asked to lie down on a table and remain still while the images are being taken. The procedure is generally considered safe, but as with any medical imaging test, there is a small risk of exposure to radiation.

SPECT-CT for feet can help diagnose a variety of conditions and can aid in treatment planning by providing detailed information about the location and extent of abnormalities in the feet. Your doctor will determine if this imaging test is appropriate for your specific situation.

Common foot x-ray measurements

Here are 22 of the most common foot X-ray measurements:

  1. Medial malleolar distance: The distance between the medial malleolus (inside ankle bone) and the center of the talus to assess ankle joint stability.
  2. Lateral malleolar distance: The distance between the lateral malleolus (outside ankle bone) and the center of the talus to assess ankle joint stability.
  3. Talar declination angle: The angle between the talar dome (top of the ankle bone) and a horizontal line to assess the vertical alignment of the talus.
  4. Talar-first metatarsal angle: The angle between the long axis of the talus and the long axis of the first metatarsal to assess forefoot and midfoot alignment.
  5. Calcaneal inclination angle: The angle between the calcaneal axis (line from the top of the calcaneus to the bottom) and a line perpendicular to the floor to assess hindfoot alignment.
  6. Talocalcaneal angle: The angle formed between the line bisecting the talus and the calcaneus to assess hindfoot alignment.
  7. Tibiotalar angle: The angle formed between the tibial axis (line from the top to the bottom of the tibia) and the talus to assess ankle joint alignment.
  8. Anterior tibial translation: The distance between the tibial plafond (top of the tibia) and the anterior edge of the talus to assess anterior ankle instability.
  9. Talar tilt angle: The angle between the talar neck (narrow part of the ankle bone) and a line perpendicular to the floor to assess ankle joint instability.
  10. First metatarsophalangeal joint angle: The angle between the first metatarsal and the proximal phalanx of the big toe to assess hallux valgus deformity.
  11. Intermetatarsal angle: The angle between the first and second metatarsals to assess hallux valgus deformity.
  12. Hallux interphalangeal angle: The angle between the proximal and distal phalanges of the big toe to assess hallux rigidus deformity.
  13. Calcaneal pitch angle: The angle between the calcaneal axis and a line perpendicular to the floor to assess hindfoot alignment.
  14. Arch angle: The angle between the navicular bone and the first metatarsal to assess foot arch height.
  15. Naviculocuneiform angle: The angle formed between the navicular bone and the medial cuneiform bone to assess forefoot alignment.
  16. Meary’s angle: The angle formed between the first metatarsal and the talus to assess forefoot alignment.
  17. Metatarsal protrusion distance: The distance between the longitudinal axis of the first metatarsal and the second metatarsal to assess forefoot alignment.
  18. First metatarsal declination angle: The angle formed between the first metatarsal and the ground to assess forefoot alignment.
  19. Sesamoid position: The position of the sesamoid bones (small bones under the big toe joint) to assess hallux valgus deformity.
  20. Distal metatarsal articular angle: The angle between the first metatarsal shaft and the articular surface of the head of the metatarsal to assess hallux rigidus deformity.
  21. Proximal phalanx articular angle: The angle between the proximal phalanx of the big toe and the metatarsal head to assess hallux valgus deformity.
  22. Metatarsal parabola angle: The angle formed between the longitudinal axis of the first metatarsal

Weber classification for fibular fractures

Weber fractures are a classification system for fractures of the ankle, specifically the fibula bone. The Weber classification system is based on the location of the fracture relative to the ankle joint and the degree of displacement of the fracture.

There are three types of Weber fractures:

  • Weber A: This is a fracture of the fibula that occurs below the level of the ankle joint. The ankle joint itself is not affected. The fracture may be non-displaced (the bone is still aligned properly) or displaced (the bone is out of alignment). This type of fracture is usually treated with immobilization and rest.
  • Weber B: This is a fracture of the fibula that occurs at the level of the ankle joint. The ankle joint is also affected, as the fracture extends into the ligaments that connect the fibula to the tibia bone. This type of fracture is typically treated with immobilization, rest, and sometimes surgery to realign the bones and stabilize the joint.
  • Weber C: This is a fracture of the fibula that occurs above the level of the ankle joint, often at the level of the syndesmosis (the joint between the tibia and fibula bones). The ankle joint is not usually affected, but there may be significant ligament damage. This type of fracture is often treated with surgery to realign the bones and stabilize the joint.

Overall, the Weber classification system is a useful tool for healthcare professionals in assessing and managing ankle fractures. Treatment options for Weber fractures may include immobilization with a cast or brace, surgery to realign the bones and stabilize the joint, and physical therapy to restore range of motion and strength to the ankle.

Salter-Harris classification for growth plate fractures

The Salter-Harris classification is a system used to classify fractures that involve the growth plate, also known as the epiphyseal plate, in pediatric patients. The growth plate is a cartilage-rich area at the ends of long bones that allows for bone growth and development.

The Salter-Harris classification divides growth plate fractures into five categories, based on the location and extent of the fracture:

Type I: This is a transverse fracture that runs through the growth plate, separating the epiphysis (the end of the bone) from the metaphysis (the shaft of the bone). This is the most common type of growth plate fracture and is usually treated with immobilization and close monitoring.

Type II: This is an oblique fracture that runs through the growth plate and into the metaphysis. This type of fracture is also treated with immobilization and monitoring, and may require more frequent follow-up to ensure proper healing.

Type III: This is a fracture that runs through the growth plate and into the epiphysis. This type of fracture may require more aggressive treatment, such as surgery, to prevent long-term complications such as growth disturbances or joint deformities.

Type IV: This is a fracture that runs through the growth plate, the epiphysis, and the metaphysis. This type of fracture is relatively rare and may require surgical intervention to prevent long-term complications.

Type V: This is a crush injury to the growth plate that results in damage to the cells responsible for bone growth. This type of fracture is also relatively rare and may require surgical intervention to prevent growth disturbances.

The Salter-Harris classification is a useful tool for healthcare professionals in assessing and managing growth plate fractures in pediatric patients. Treatment options for growth plate fractures may include immobilization, closed reduction (manipulation of the bones to restore proper alignment), and surgery in some cases.

Overall, prompt and appropriate treatment of growth plate fractures is important to minimize the risk of long-term complications and ensure proper bone growth and development.

Sanders classification for calcaneal fractures

The Sanders classification is a system used to categorize calcaneal fractures, which are fractures of the heel bone in the foot. The classification was developed by Dr. Roy W. Sanders, an American orthopedic surgeon, in 1993.

The Sanders classification divides calcaneal fractures into four categories, based on the location and severity of the fracture:

Type I: This is a simple, non-displaced fracture of the posterior calcaneal tuberosity, which is a bony protrusion at the back of the heel bone. This type of fracture is considered to be relatively minor, and is often treated non-surgically with immobilization and rest.

Type II: This is a displaced fracture of the posterior calcaneal facet, which is the portion of the heel bone that articulates with the talus bone in the ankle joint. This type of fracture can result in joint incongruity (misalignment) and can be associated with long-term complications.

Type III: This is a fracture involving both the posterior calcaneal facet and the middle facet of the heel bone. This type of fracture is more severe than Type II, and is associated with a higher risk of complications.

Type IV: This is a fracture involving the entire calcaneus bone, and is the most severe type of calcaneal fracture. This type of fracture can result in significant joint incongruity and is associated with a high risk of long-term complications.

The Sanders classification can be useful in guiding treatment decisions for calcaneal fractures, as the severity and location of the fracture can impact the likelihood of complications such as joint incongruity and post-traumatic arthritis. Treatment options for calcaneal fractures may include immobilization with a cast or brace, surgery to realign the bones and stabilize the joint, and in some cases, joint replacement surgery.

Overall, the Sanders classification is a valuable tool for healthcare professionals in assessing and managing calcaneal fractures, and can help improve patient outcomes through more targeted and effective treatment.

Hawkins classification for talar fractures

The Hawkins classification is a system used to categorize talar fractures, which are fractures of the talus bone in the ankle. The classification was developed by Dr. Herbert Hawkins, an American orthopedic surgeon, in 1970.

The Hawkins classification divides talar fractures into four categories, based on the location and severity of the fracture:

Type I: This is a non-displaced fracture of the talar neck, which is the narrow portion of the talus bone between the body of the talus and the ankle joint. The blood supply to the talus is usually preserved in this type of fracture.

Type II: This is a displaced fracture of the talar neck, which can result in damage to the blood supply to the talus. This type of fracture is considered to be more severe than Type I.

Type III: This is a fracture of the body of the talus, which is the large, rounded portion of the bone that forms the ankle joint. This type of fracture is often associated with significant damage to the blood supply to the talus, and can result in avascular necrosis (death of bone tissue due to loss of blood supply) of the talus.

Type IV: This is a fracture of the posterior process of the talus, which is a small projection on the back of the talus bone. This type of fracture is less common than the other three types, and is generally considered to be less severe.

The Hawkins classification can be useful in guiding treatment decisions for talar fractures, as the severity and location of the fracture can impact the likelihood of complications such as avascular necrosis. Treatment options for talar fractures may include immobilization with a cast or brace, surgery to realign the bones and stabilize the joint, and in some cases, joint replacement surgery.

Overall, the Hawkins classification is a valuable tool for healthcare professionals in assessing and managing talar fractures, and can help improve patient outcomes through more targeted and effective treatment.

X-rays of your feet

X-rays are commonly used to diagnose foot and ankle problems. They provide a detailed image of the bones in the foot and ankle, allowing healthcare providers and podiatrists to identify any abnormalities or injuries. Some of the conditions that may require an X-ray of the foot or ankle include:

  1. Fractures: X-rays are often used to diagnose fractures or breaks in the bones of the foot or ankle.
  2. Arthritis: X-rays can help identify the presence and severity of arthritis in the foot or ankle.
  3. Bone Spurs: X-rays can also detect the presence of bone spurs, which are bony growths that can develop on the bones of the foot or ankle.
  4. Deformities: X-rays can help identify any structural deformities in the foot or ankle, such as flat feet or high arches.
  5. Tumours: In rare cases, X-rays may be used to detect the presence of tumours in the foot or ankle.

During the X-ray procedure, you will be asked to lie or stand still while a machine takes images of your foot or ankle. The process is quick and painless, and the images can be used to help diagnose and treat any foot or ankle problems you may be experiencing. Your healthcare provider or podiatrist will be able to interpret the results of the X-ray and recommend appropriate treatment options.

Ultrasound of the foot

Ultrasound can be used as a diagnostic tool for various foot and ankle conditions. It uses high-frequency sound waves to create images of the internal structures of the foot, including bones, soft tissues, and blood vessels. Ultrasound can help diagnose conditions such as plantar fasciitis, Achilles tendonitis, Morton’s neuroma, stress fractures, and other soft tissue injuries.

Ultrasound can also be used to guide certain treatments for foot and ankle conditions. For example, ultrasound-guided injections can be used to deliver medication directly to the affected area, such as a joint or tendon, for more precise and effective treatment.

Overall, ultrasound is a safe and non-invasive imaging technique that can provide valuable information for diagnosing and treating foot and ankle conditions. If you are experiencing foot pain or other symptoms, speak with your healthcare provider to see if an ultrasound may be helpful in diagnosing your condition.